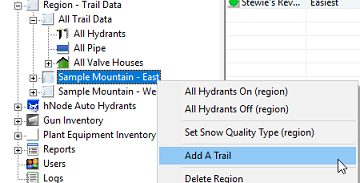
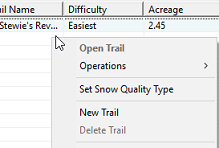
There are three ways to add a new trail to your Scolo project. Any of the following will work to open the window for creating the trail.
- Right click on an existing regionthe navigation window and select the ‘Add A Trail’ menu option.

- Select a region the navigation window by clicking on it, right click on any empty spot in the main window and then select the ‘New Trail’ menu option.

- From the main menu select ‘Trails’ and then the ‘New Trail’ menu item.

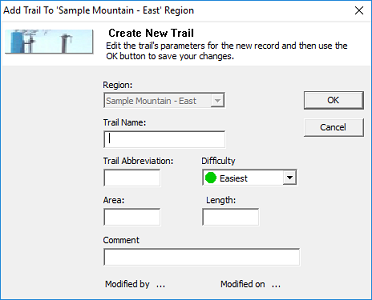
You are then given a window for entering the information pertaining to this trail.

Region: Depending on the method you use above, you might be able to select what region to add the trail to. This control might be disabled.
Trail Name: A unique trail name that will be displayed in the application.
Trail Abbreviation: This value is used as a prefix for the hydrants added to this trail. It must be unique to the project so you might need to use three (3) or more characters. Some pre-planning on this might prove to be helpful.
Trail Difficulty: This is the icon that the main window will display with the trail.
Area: The surface area of the trail in whatever unit of measurement you would like. This value is not used anywhere in the application but might be useful for custom reporting.
Length: The length of the trail in whatever unit of measurement you would like. Like area this is not used by Scolo’s default logic but might be useful for custom reporting.
Comment: This field is used for tooltip pop-up messages if you would like add something.
These values can be modified later by double clicking on a trail name in the navigation window or selecting the ‘Trail Properties’ right click menu item.
Use the OK button to save your changes or Cancel to exit without saving.